How To Use Moviecaptioner For Mac
Editing Your Captions
MovieCaptioner is a handy and reliable utility designed to generate captions and transcripts for video files. It repeats a segment of the movie until you are done typing what you hear. Just hit the Return key and it will save your caption and automatically advance to the next few seconds of the movie, allowing you to zip through your captioning tasks in no time flat. The sub-US$100 MovieCaptioner for Mac can create timed subtitles and captions and then export them for virtually any output situation. That includes 28 export formats I’ll list ahead, including the ones you need for broadcast closed captions, online services like Amazon Direct Video, YouTube and Vimeo, for DVD/Blu-Ray and more.
At any point while you're transcribing, you can stop your video either by clicking on the Stop button (same button as the Start button) and edit your captions. To edit your captions click on any caption in the caption list on the right and edit directly in the list. Save the text area below the movie for new captions only to avoid adding captions where they don't belong. You may edit both the timecode and the captions by selecting them and typing right in the list. Be very careful to keep the formatting of the timecode. Timecode is always HH:MM:SS.ss. There will always be a decimal in the timecode between the seconds and hundredths of seconds, and note that the timecodes are always displayed in hundredths of a second no matter what you have selected in the Preferences window for the frame rate. The correct frames will be calculated when you export your final caption file. Once you're done editing, hit your Return or Enter key to confirm the change to the text or timecode.
These two short videos will give you a good idea how to edit your captions in MovieCaptioner.
Editing Your Captions - Part 1
This video describes how to use the editing buttons at the bottom of the MovieCaptioner interface to give you more flexibility on how you want your captions to display.Editing Your Captions - Part 2
Editing Your Captions - Part 2
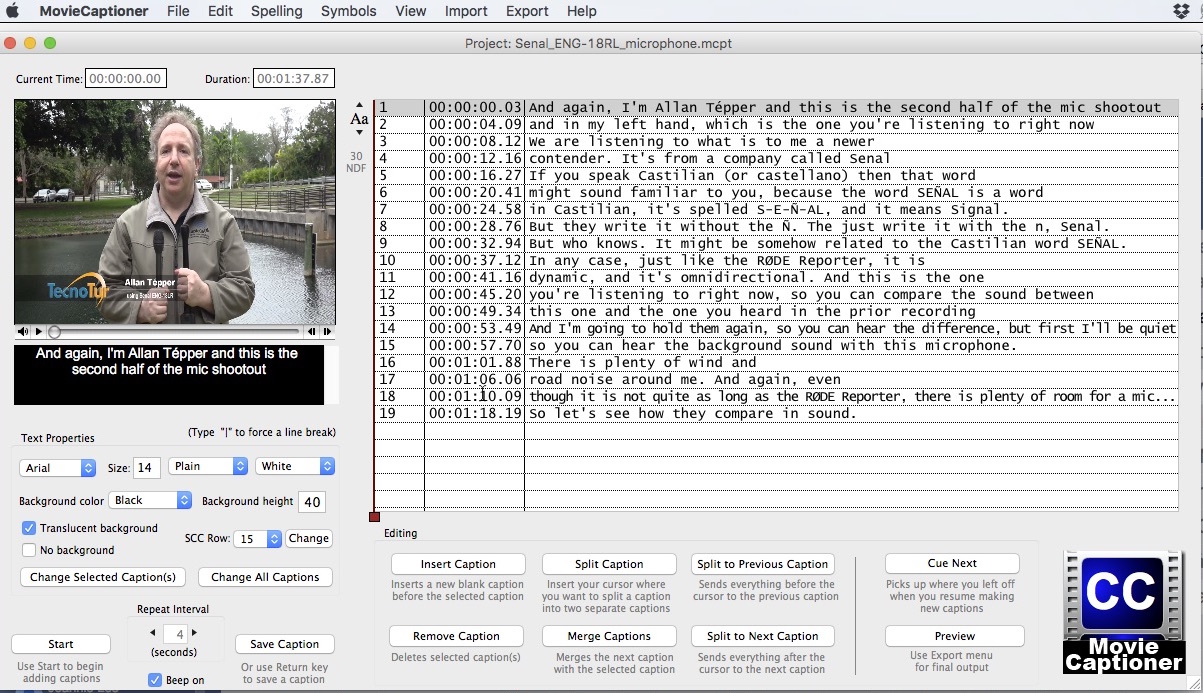
In this video we take a look at how to change the text properties of the captions you've already transcribed. We also look at the background properties and the options available for those as well. Be sure to click The Change Selected Caption or Change All Captions or your text properties won't change!If you need to change the font, size, style, or color of the text, make those selections in the Text Properties area under the movie and click the correct button whether you want to change that particular caption or several selected captions (Change Selected Caption(s)), or if you want to change them all (Change All Captions button). Changes to the text properties will not take place if you don't click one of those buttons. The settings will only be used for new captions. You won't need to click either of those buttons if you are in the process of transcribing as the settings will be used automatically while transcribing.
Editing buttons
There are a series of editing buttons below the caption list that allow you to insert and delete captions, and to manipulate the length of captions by either splitting, combining, or otherwise redistributing portions of a caption to another caption. These functions can also be accessed under the Edit menu.
Fairbanks scales manuals. The Insert Caption button allows you to add a caption anywhere in the video. To use it, select a caption that you want the new one to come before and hit the Insert Caption button. A blank caption will be added just before the caption you had selected at a timecode somewhere between your selected caption and the one that was before it. You can fine tune the timecode manually if you wish. You may also add text to this new caption by typing directly over the blank caption. This button is particularly helpful if you have a caption that you want to expire after a certain period of time. A blank caption will make the previous caption disappear.
Part of the efficiency of transcribing in MovieCaptioner is the fact that you don't need to add end times for each caption. The next caption always overwrites the previous one and if you want no caption there, you can just insert a blank caption.
The Remove Caption does exactly what you think. Any caption (or series of captions) can be removed by selecting them and clicking the Remove Caption button.To use the Split Caption button, place your cursor somewhere within the caption where you want it to be broken and then click the Split Caption button. It will add a new caption after the one you selected with everything to the right of where your cursor was placed. Timecode should be somewhere between the old caption and the one that comes after the new one. It can be manually changed.
The Merge Captions button allows you to combine two captions. Just select the caption you want to be the first part and the caption following it will be deleted and its text will be added to the caption you have selected.
The Split to Previous button works similar to the Split Caption except that wherever you place the cursor, all the text to the left of the cursor will be added to the end of the previous caption.The Split to Next button works just the opposite way. Everything to the right of your cursor will be moved to the beginning of the next caption.
After you're done editing, if you want to go back to transcribing new captions, you will need to click the Cue Next button prior to clicking the Start button again. This is so that MovieCaptioner can cue up the video playhead to the correct time after the last caption you recorded in your list. If you don't click this button, it could start the movie at the timecode of the last caption you selected or edited. You will need to use this button after previewing your captions as well, so that it's ready to go when you click the Start button.Next Up..Previewing Your Captions »»
Importing Text Transcripts
Saving Text Files Properly for Import
Importing text files improperly can set you up for problems down the road. If you import a text file saved from Microsoft Word, for example unsupported characters can be introduced into your captions that could result in missing words or invalid caption files.
Some of these characters are curly apostrophes, smart quotes, em-dashes, em-dashes, and some others that aren't recognized by many software programs and caption formats. Before importing into MovieCaptioner, the trick is to save a text file with UTF-8 Encoding, which will substitute supported versions of those characters (such as straight quotes and apostrophes) when the encoding is changed. This option is usually present when you do a Save As in your word processing program. You would choose Plain Text, then choose the UTF-8 Encoding option. Here is an example of the Save AS window in Microsoft Word with the option for UTF-8 Encoding selected.
Importing Text Files
In this video we look at the proper way to import plain text files. It's important when you save your plain text files to use UTF-8 Encoding to eliminate unsupported characters that may cause issues with your captions. We will import text line by line and text in paragraph form in this video.
Importing Text in Paragraph Form
If you have paragraphs of text that you need to import into MovieCaptioner (no timecode available), then this is the option to choose. After saving your plaint text file with UTF-8 Encoding (see above) choose Text in Paragraph Form from the Import menu in MovieCaptioner. MovieCaptioner will then look at your Preferences to see how many characters to use as a means of breaking up the paragraphs into individual captions. The default is 90 characters per line, but this can easily be changed to whatever you want in the Preferences window.
After importing, you'll see that all the timecode is set to '00:00:00.00'. You will need to use the Set Timecode button (< href='set_timecode.html'>next page) to sync the captions with your video.
Importing Text in Line Form
If you have text that is broken up into individual lines, you can use this import to make each line a separate caption. And, if the transcript you're importing is properly formatted (using brackets around the timecode and a tab between the timecode and caption), MovieCaptioner can import it with the timecode intact.
If, after importing, your transcript did not include timecode, you'll see that all the timecodes will be set to '00:00:00.00'. You will need to use the Set Timecode button (next page) to sync the captions with your video.
Other Import Options
MovieCaptioner has lots of different caption file formats that it can import. If the caption file is formatted correctly you can use its import option to import it into MovieCaptioner with the captions intact. A few that use a particular formatting that need to be noted are Tab-Delimited Text, CART File, and CC_Output.
The Tab-Delimited Text and CART File options will look for tabs between the timecodes and the captions. If you instead have spaces or commas, try doing a Find/Replace in your text editor to add tabs between the timecodes and captions.
The CC_Output option looks for a '*T' that will denote a timecode line.